Loading...

Robots.txt is a simple text file that instructs web crawlers on how to crawl a website and is an important aspect of Search Engine Optimization (SEO). A site owner uses `robots.txt` to effectively guide search engines regarding pages not to be indexed. By doing this, a site owner brings Search Engine Optimization activities under control and prevents the crawling, and indexing of duplicate content and sensitive content.
History of `robots.txt`
The Robots Exclusion Protocol, or robots.txt, was invented in 1994 with the idea of providing standard ways for webmasters & crawlers to communicate with one another. Eventually, the standard was taken into account by major search engines such as Google, Bing, and Yahoo!.
How `robots.txt` Works
The `robots.txt` file must be placed in the root directory of a website. For example, it should be accessible at `https://www.example.com/robots.txt`.
It only takes a few steps to see how `robots.txt` works. Let's take a look:
Step 1: Crawlers Request Access
- Start: When a web crawler (such as Googlebot) visits a website, it requests access to the `robots.txt` file first.
- URL Request: The crawler requests access to the file, i.e., by accessing `https://www.example.com/robots.txt`.
Step 2: Server Response
- File Retrieved: If the file exists, the web server responds with the content of the `robots.txt` file.
- 404 Error Handling: If the file does not exist, then the web server will return a 404 error, and the crawler has access to all content by default.
Step 3: Parsing the Directives
- Read File: The crawler will read the directives in the `robots.txt` file. The crawler sees which user-agents (crawlers) the rules apply to and which directories or pages are disallowed or allowed.
Step 4: Following the Rules
The crawler decides based on the directives:
- If the path is Disallowed - the crawler will not index or access this path.
- If the path is Allowed - the crawler can index the content of that directory or page.
Step 5: Indexing Content
- Allowed Crawling: The crawler will crawl the allowed pages and once again collect the data needed to present in the search results.
- Disallowed Crawling: The crawler ignores disallowed directories/pages, so it does not index them.
Step 6: Maintenance
- File Updates: The webmaster may update the `robots.txt` file whenever she/he/they chooses to specify parameters for crawler access.
- Crawlers Revisit: Crawlers will periodically check the `robots.txt` file to determine whether the directives have changed.
How to locate the `robots.txt` File
Finding the `robots.txt` file for any website is very easy. Just follow these simple steps:
1. Open Your Web Browser: Launch any web browser such as Chrome, Firefox, or Safari.
2. Type the Website URL: In the address bar, type in the full URL of the website you want to check. For example, `https://www.example.com`.
3. Add `/robots.txt`: Once you've entered the website URL, add `/robots.txt`at the end of the URL. So now we'd enter `https://www.example.com/robots.txt`.
4. Press Enter: Once you've entered the URL, just press Enter and be taken to that specified URL.
5. View the File: If the website has a `robots.txt` file, it will appear. It will be in plain text. You can now see the directives that the website has put down in the file.
How to write & Submit the `robots.txt` File
A `robots.txt` file only needs a few steps to create and submit the file. Here is what you need to do:
Step 1: Create the `robots.txt` file
1. Open a Plain Text Editor: There are many plain text editors you can use, including Notepad (Windows), TextEdit (as a plain text file) (Mac), or you could use a code editor like VS Code.
2. Write your directives. Start by writing your `robots.txt` file in the proper syntax. Here are a few examples:
User-agent: *

Disallow: /private/
Allow: /public/

Sitemap: https://www.example.com/sitemap.xml
3. Save the File: Save the file as `robots.txt`. Make sure to save it using plain text format (not in Word or any other format).
Step 2: Upload the `robots.txt` File
1. Find Your Website's Root Directory: Use an FTP client (for example FileZilla) or your web hosting's control panel (for example cPanel) to access the files for your website.
2. Go to the Root Directory: This is usually the folder where your website files are located, with the folder title being `public_html` or similar.
3. Upload the File: Drag and drop the `robots.txt` file into the root directory. Make sure it's at the top level and not in one of the subfolders.
Step 3: Verify the `robots.txt` File
1. Open Your Web Browser: You will need to open any web browser.
2. Enter the URL: Write your website url and add `/robots.txt` to the end (for example: `https://www.example.com/robots.txt`)
3. Check That It Displays Correctly: Make sure that the file displays and follows the directives that you wrote.
Step 4: Validate the `robots.txt` File
1. Google Search Console:
- Log in to your Google Search Console account.
- Pick the website property you want to work with.
- Go to "Settings" > "Crawling" > "robots.txt".
- After this, click on open report to test your `robots.txt` file.

2. Bing Webmaster Tools:
- Log in to Bing Webmaster Tools
- Select Your Website Property
- Click on “Tools & Enhancements”>“robots.txt Tester”
- Validate Your robots.txt File

Step 5: Monitor and Update
- Regular Check: Perform an occasional check of your `robots.txt` file to make sure it reflects your current needs.
- Update as Needed: If you change your website structure or content, make changes in the `robots.txt` file as needed and re-upload it.
Example Structure:
User-agent: *
Disallow: /private/
User-agent: the crawler being specified.
Disallow: Indicates which paths should not be accessed.
Common Directives in `robots.txt`
Directive | Description | Example |
User-agent | Identifies the web crawler | User-agent: Googlebot |
Disallow | Block access to specified paths | Disallow: /private/ |
Allow | Permits access to specific paths | Allow: /public/ |
Crawl-delay | Sets a delay between requests | Crawl-delay: 10 |
Sitemap | Links to the sitemap for better indexing | Sitemap: https://www.example.com/sitemap.xml |
Robots.txt Best Practices:
- Keep it Simple: Your rules should be clear and unambiguous. Do not use complicated conditions.
- Ensure Accessibility for Important Content: Be careful to allow access to the pages that are important to you.
- Test the File: You can use tools such as Google Search Console to check for errors.
- Update Regularly: Review the file regularly as your site changes over time.
Common Mistakes to Avoid
Error | Definition |
Blocking Important Pages | Accidentally disallowing pages that should be indexed. |
Misusing Disallow | Incorrectly blocking entire directories instead of specific files. |
Failing to Test | Not using tools to verify the effectiveness of the file. |
Ignoring User-Agent Specificity | Not considering different crawlers needs. |
Testing Ensuring robots.txt is functional
- Google Search Console (use for robots.txt validation)
- web server logs (check bots that visited the blocked address)
- Robots.txt checkers (have some online options).
Example
Case Studies:
- Amazon.com
- Use robots.txt to block specific paths to optimize crawling, e.g.
    User-agent: *

    Disallow: /gp/cart
2. YouTube:
- Disallows user-specific pages to protect privacy.
- Example:
     user-agent: *

     Disallow: /login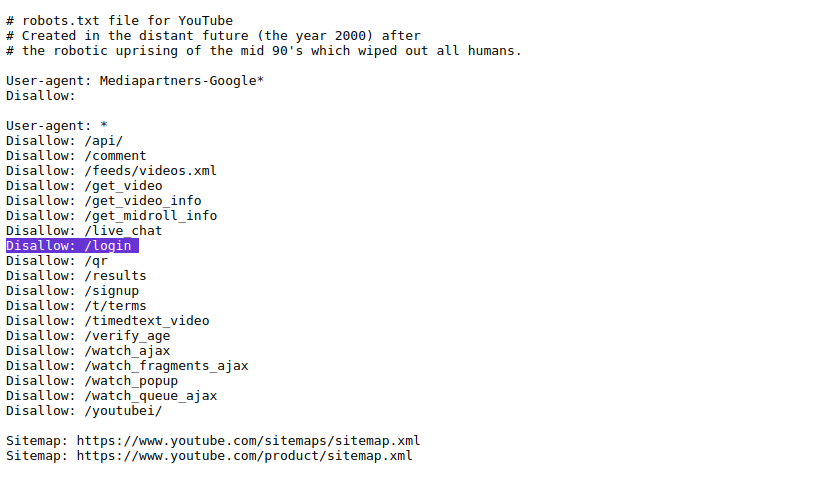
Advanced Topics
- Dynamic Generation: Some sites may generate `robots.txt` based on user sessions or as content is updated.
- As Part of your SEO Strategy: Use the `robots.txt` file in conjunction with the use of meta tags as well as canonical links to optimize for SEO.
- Performance considerations: A well-designed `robots.txt` can potentially increase your site speed by reducing the load on the server for disallowed files.
Conclusion
In summary, `robots.txt' is a valuable resource for webmasters to achieve some control of how web crawlers behave. Webmasters who check and frequently update the `robots.txt' file will help enhance the SEO of their websites. As a webmaster, such a basic understanding of the structure and directive values in 'robots.txt' files is essential.